WordPress is one of the most popular content management systems (CMS) in the world, powering over 40% of all websites on the internet. Its flexibility, ease of use, and robust community make it a great choice for anyone looking to create a blog or website.
In this article, we’ll take you through the step-by-step process of creating a WordPress blog, from signing up to a hosting provider to customising your site’s design and functionality. Whether you’re a beginner or an experienced blogger, this guide will help you get your WordPress blog up and running in no time.
Signing up to WebPower
If you’re looking for a reliable and affordable web hosting provider, WebPower is a great option.
We offer a variety of hosting plans and services, all with top-notch security and support.
Signing up for WebPower.uk is a simple and straightforward process, and we’ll walk you through the steps to create your account and get started with your new web hosting plan.
Step 1: Choose your hosting plan
The first step in signing up for WebPower is to choose the hosting plan that best suits your needs. We offer several different plans, so take some time to review the features and pricing to find the plan that’s right for you.
If you’re just starting out with a small website, the MyPower plan might be a good fit, while larger sites with more traffic may require the BigPower or GrandPower plan.
Step 2: Enter your domain name
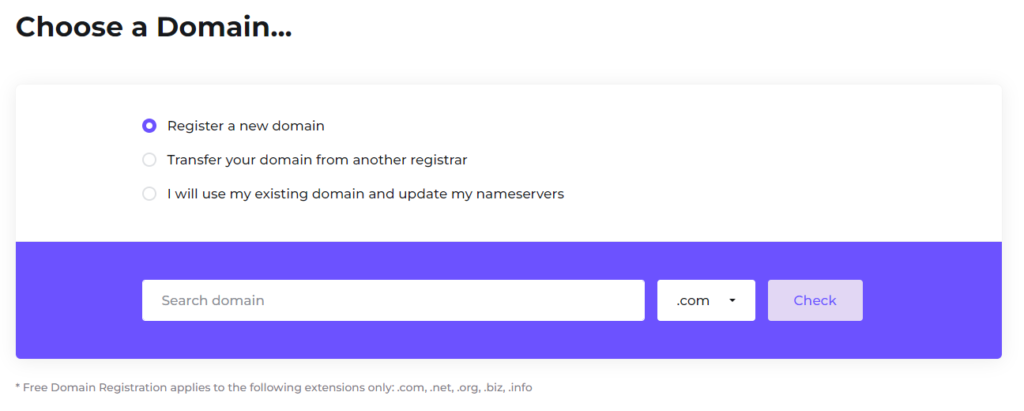
After selecting your hosting plan, you’ll need to enter your domain name.
If you already have a domain name, you can enter it here and WebPower will guide you through the process of pointing your domain to their servers.
If you don’t have a domain name yet, WebPower offers domain registration services, so you can purchase and register a new domain name directly through us when checking out.
Step 3: Enter your personal information
Next, you’ll need to enter your personal information, including your name, email address, and billing information. WebPower offers several different payment options, including credit card and PayPal, so you can choose the one that works best for you.
Step 4: Review and confirm your order
Before completing your order, make sure to review all the details, including your chosen hosting plan, domain name, and billing information. If everything looks correct, go ahead and confirm your order, and WebPower will create your account and send you an email with instructions on how to access your new hosting plan.
Signing up for WebPower.uk is a quick and easy process that can be completed in just a few simple steps. By following the instructions outlined above, you can get your new web hosting plan up and running in no time.
How to install WordPress on WebPower’s hosting
The process of installing WordPress on your hosting plan might seem daunting at first. However, with the help of cPanel, a web-based control panel that allows you to manage your hosting account, installing WordPress on WebPower’s hosting is a simple and straightforward process.
We will guide you through the steps to install WordPress on WebPower’s hosting through cPanel, so you can get your website up and running in no time.
Step 1: Log in to cPanel
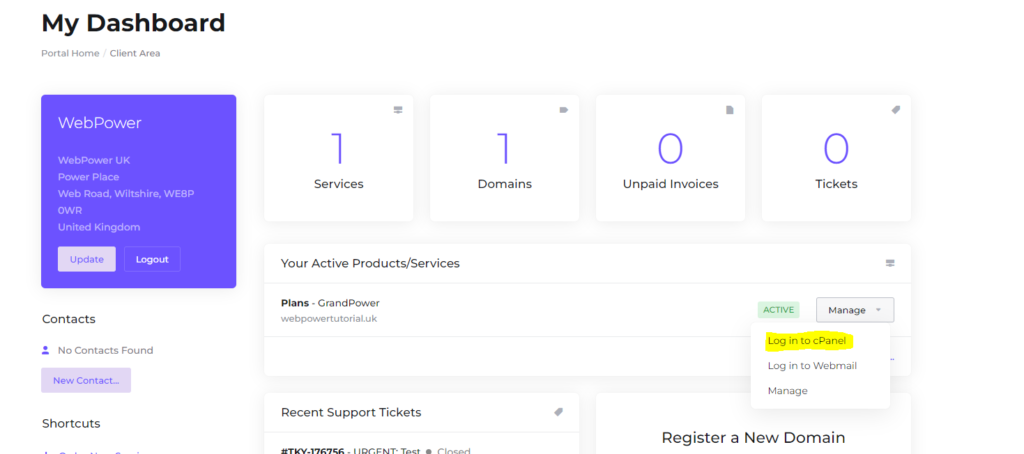
To begin, log in to your WebPower hosting account and navigate to cPanel. You can access cPanel by clicking on the “Login to cPanel” button in your hosting account dashboard.
Step 2: Navigate to the Softaculous App Installer
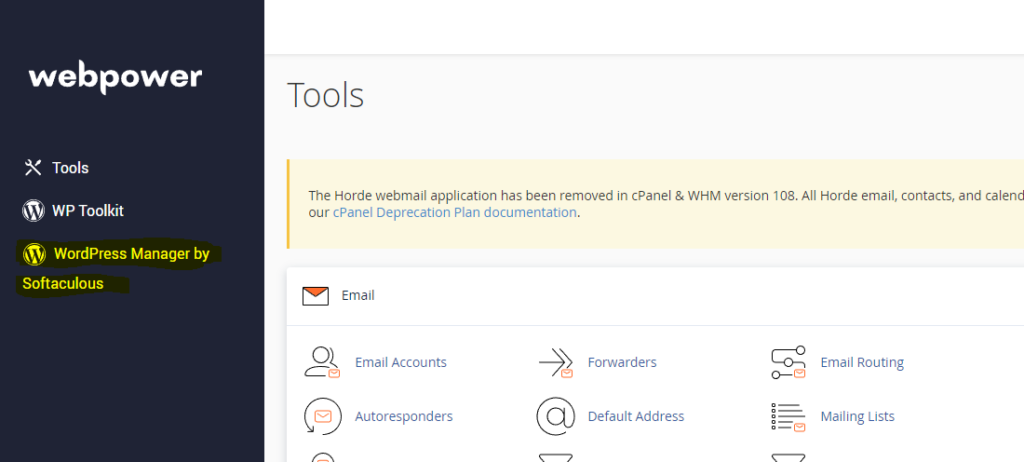
Once you’re in cPanel, look for the Softaculous App Installer icon and click on it. This will take you to a page with a list of available applications you can install on your hosting plan.
Step 3: Select WordPress
On the Softaculous App Installer page, scroll down until you find the WordPress icon and click on it. This will take you to the WordPress installation page, where you can customise the installation settings.
Step 4: Customise the installation settings
On the WordPress installation page, you’ll need to enter some basic information about your website, such as the site name, description, and admin username and password.
You can also select the language and the theme you want to use for your website.
Step 5: Install WordPress
Once you’ve customised the installation settings, click on the “Install” button to begin the installation process.
Softaculous will take care of the rest, installing WordPress on your hosting plan and creating the necessary databases and files.

Step 6: Access your WordPress site
After the installation is complete, you can access your new WordPress site by clicking on the “Administrative URL” link in the Softaculous installation page. This will take you to the WordPress login page, where you can enter your admin username and password to access the WordPress dashboard.
Installing WordPress on WebPower’s hosting through cPanel is a simple and straightforward process that can be completed in just a few easy steps.
By following the instructions outlined above, you can have your new WordPress site up and running in no time, and start building the website of your dreams with the help of WebPower.uk’s powerful and reliable hosting services.
Editing your WordPress dashboard settings
Congratulations on setting up your WordPress site! Now that you have installed WordPress, it’s time to configure your dashboard settings to make sure your site is up and running smoothly.
Next, we’ll guide you through the process of configuring your WordPress dashboard settings.
Step 1: Remove unused pages, posts, themes, and plugins
When you install WordPress, it comes with some default pages, posts, themes, and plugins that you may not need. Go through each of them and delete the ones you don’t need.
This will help you declutter your dashboard and make it easier to navigate.
Step 2: Add a home page
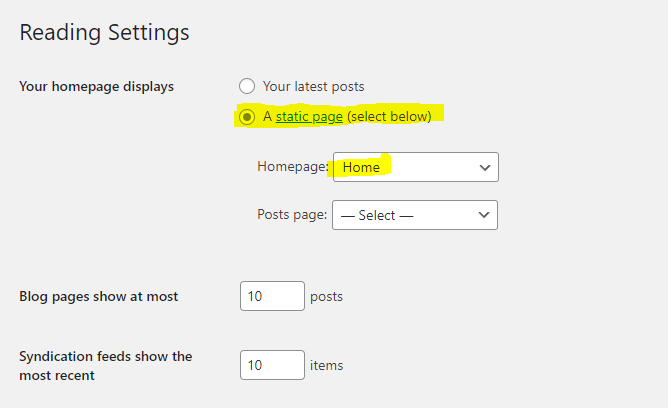
By default, WordPress displays your latest blog posts on the homepage. However, if you want to create a more static homepage, you’ll need to create a new page and set it as the homepage.
To do this, navigate to Pages > Add New and create a new page. Give it a title, such as “Home,” and add some content to it.
Then, navigate to Settings > Reading and set the “Front page displays” option to “A static page.” Choose the page you just created as the “Front page” option, and save your changes.
Step 3: Install the Elementor plugin
Elementor is a popular drag-and-drop page builder that allows you to create beautiful and custom page layouts without any coding.
To install Elementor, navigate to Plugins > Add New and search for “Elementor.” Install and activate the plugin.

Step 4: Set permalinks to post name
Permalinks are the URLs for your pages and posts. By default, WordPress uses an unattractive permalink structure that includes numbers and symbols.
To make your permalinks more user-friendly and SEO-friendly, you’ll want to set them to post name.
To do this, navigate to Settings > Permalinks and choose the “Post name” option. Save your changes.
Setting up your WordPress dashboard settings is an essential step in building a successful website.
By removing unused pages, posts, themes, and plugins, adding a home page, installing the Elementor plugin, setting the homepage as the static page, and setting permalinks to post name, you’ll be on your way to creating a beautiful and functional website that your visitors will love.
How to create a home page with Elementor
If you’re using WordPress, Elementor is an excellent tool for designing and customising your website. With Elementor, you can create stunning home pages that are sure to impress your visitors.
We will show you how to create a home page with Elementor step-by-step.
Step 1: Install and activate the Elementor plugin
If you haven’t already, you’ll need to install and activate the Elementor plugin. To do this, navigate to Plugins > Add New and search for “Elementor.” Click on “Install Now” and then “Activate” to activate the plugin.
Step 2: Create a new page
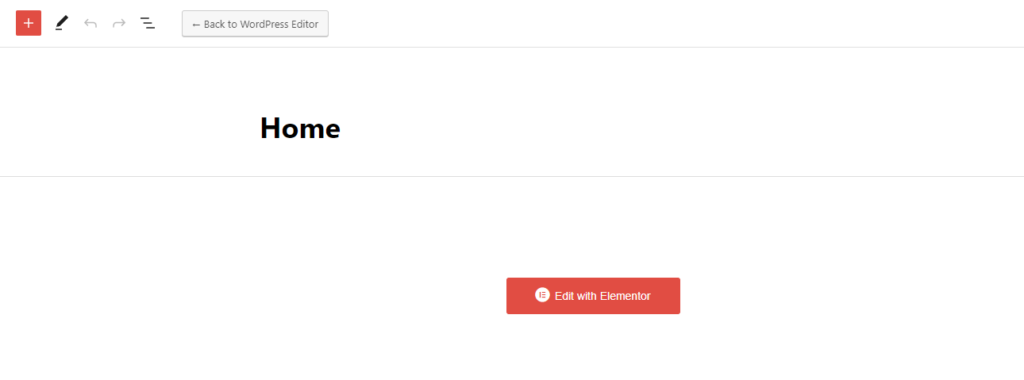
To create a new home page, navigate to Pages > Add New. Give your page a title, such as “Home,” and click on the “Edit with Elementor” button to open the Elementor editor. If you were reading above then you can skip this step as you’ll already have it set up.
Step 3: Choose a template
Elementor comes with a variety of pre-designed templates that you can use as a starting point for your home page.
To choose a template, click on the folder icon at the bottom of the screen to open the template library.
You can browse the available templates by category or search for a specific one.
Step 4: Customise the template
Once you’ve chosen a template, you can customise it to fit your needs.
To do this, simply click on the elements you want to edit, such as text or images, and use the Elementor editor to make changes.
You can add new elements by dragging them from the left-hand panel onto the page.
Step 5: Add sections and columns
If you want to create a custom layout for your home page, you can add new sections and columns to the page.
To add a new section, click on the “Add Section” button in the left-hand panel.
From there, you can choose the number of columns you want and add elements to each column.
Step 6: Preview and publish your page
Once you’ve finished customising your home page, you’ll want to preview it to make sure it looks good on different devices.
To do this, click on the eye icon in the bottom left corner of the screen to open the preview mode.
If everything looks good, click on the “Publish” button to make your page live.
Creating a home page with Elementor is a straightforward process that doesn’t require any coding skills.
By following these steps, you’ll be able to create a beautiful and functional home page that will help your website stand out from the crowd.
How to create a blog post template in Elementor
As a blogger, you know that creating a consistent and visually appealing blog post layout is important for keeping your readers engaged and making your content stand out.
Elementor, a popular WordPress page builder, offers a powerful tool that allows you to create and customise blog post templates.
We’ll now walk you through how to create a blog post template in Elementor step-by-step.
Step 1: Create a new blog post
To create a new blog post, navigate to Posts > Add New. Give your post a title and enter your content. You can add images, videos, and other elements to your post as you normally would.
Step 3: Open the Elementor editor
Once you’ve created your blog post content, click on the “Edit with Elementor” button to open the Elementor editor.
Step 4: Design your template
In the Elementor editor, you can design your blog post template by adding and customising elements.
You can add a title section, a featured image section, a post content section, and more.
To add an element, simply drag it from the left-hand panel onto the page.
You can also customise the styling of your elements by using the options in the left-hand panel. You can change the font size, color, alignment, and more.
Step 5: Save your template
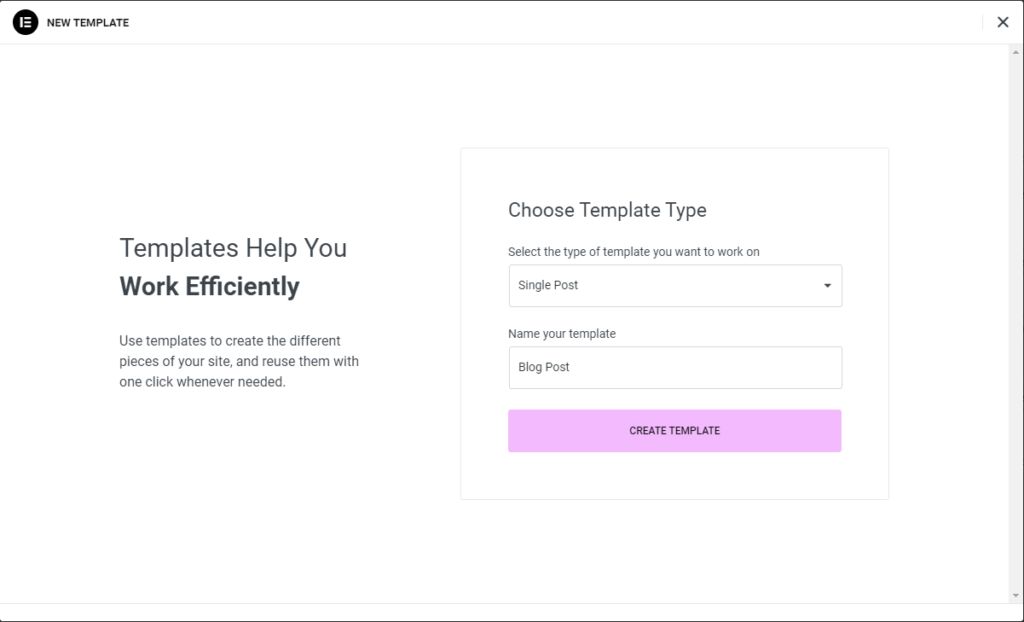
Once you’ve designed your blog post template, you’ll want to save it so you can use it for future blog posts.
To do this, click on the arrow icon in the bottom left corner of the screen and select “Save Template.” Give your template a name, such as “Blog Post Template,” and click on “Save.”
Step 6: Apply your template to future blog posts
To use your blog post template for future blog posts, simply create a new blog post as you normally would and click on the “Edit with Elementor” button to open the Elementor editor.
Then, click on the folder icon in the bottom left corner of the screen to open the template library. From there, you can select your “Blog Post Template” and apply it to your new post.
Creating a blog post template in Elementor is a great way to save time and ensure consistency across your blog posts. By following these steps, you’ll be able to create a customized blog post template that will help your content stand out and keep your readers engaged.
Conclusion
In conclusion, creating a WordPress blog can seem like a daunting task, but with the right tools and guidance, it can be a straightforward and rewarding process.
Starting from signing up to WebPower, to installing WordPress and customising your site with Elementor, each step plays a crucial role in creating a successful blog.
It’s important to choose a reliable hosting provider like WebPower that offers easy WordPress installation, as well as a powerful page builder like Elementor that can help you create stunning designs and templates.
By following the steps outlined in this blog post, you can create a professional-looking blog that will attract and engage your audience.
Don’t be afraid to experiment with different settings and designs until you find what works best for you and your blog.
Good luck!

