Managing email storage can be a daunting task, especially if your inbox is cluttered with old messages. Fortunately, cPanel offers a straightforward way to bulk delete emails, helping you free up space and keep your account organised. This guide will walk you through the steps of bulk deleting emails from your Webmail account using both the Webmail interface and cPanel’s Email Disk Usage tool.
Step 1: Access Your Webmail via cPanel
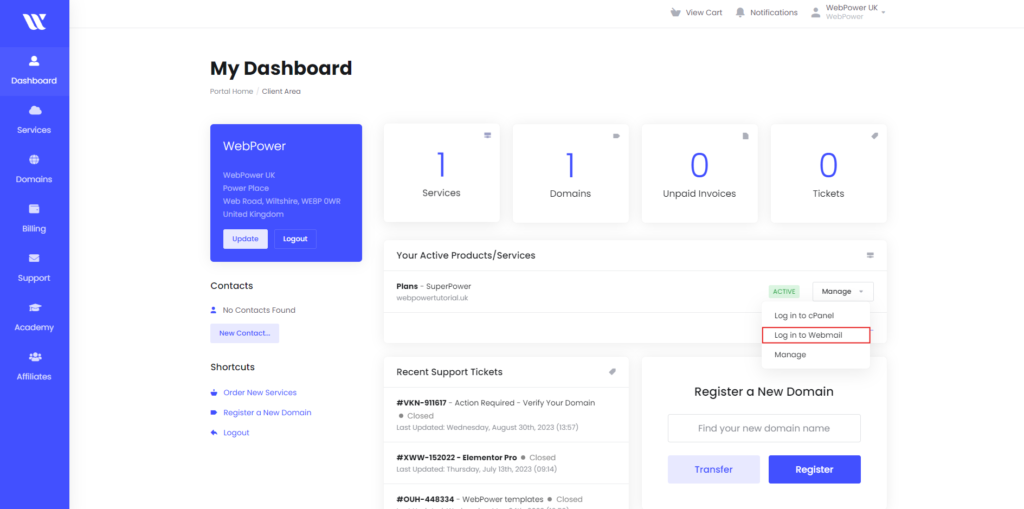
To start managing your emails, you need to log in to your cPanel account through WebPower. Here’s how you can access your Webmail:
- Log In to Your WebPower Dashboard: Go to your WebPower dashboard and navigate to Services.
- Select Your Hosting Account: Find the hosting account linked with your email and click on Email Accounts.
- Access Webmail: Click on Check Email next to the email address you wish to manage. This will open your Webmail account in a new tab.
Step 2: Choose a Webmail Client
Upon opening Webmail, you’ll need to select a client. The most commonly used Webmail clients are Roundcube, Horde, and SquirrelMail. For this tutorial, we’ll use Roundcube because of its user-friendly interface and ease of managing bulk deletions.

Step 3: Bulk Delete Emails Using Roundcube
Inside Roundcube, follow these steps to delete emails in bulk:
- Option 1: Delete All Emails at Once: To delete all emails in your inbox, click the checkbox at the top of the email list to select all visible emails. Click the Delete icon (a trash bin) to move the selected emails to the Trash folder.
- Option 2: Select Specific Emails for Deletion: For selective deletion, manually tick the checkboxes next to the emails you want to remove. Once selected, click the Delete icon to transfer them to the Trash folder.
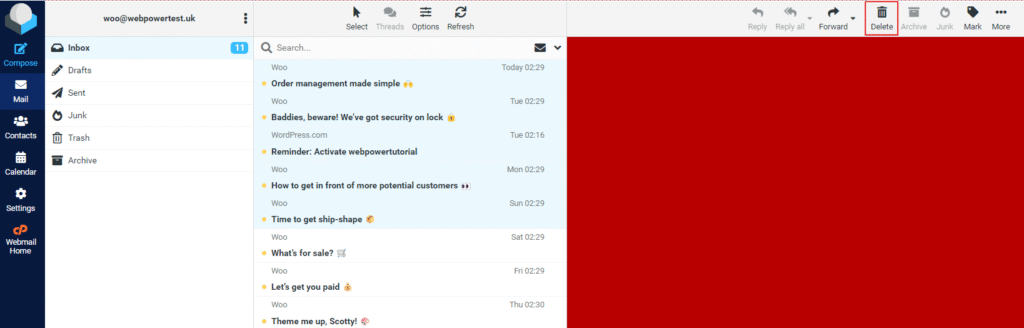
Step 4: Empty the Trash Folder
Deleting emails from the inbox only moves them to the Trash folder. To permanently delete these emails and free up space:
- Access the Trash Folder: In Roundcube’s sidebar, click on the Trash folder.
- Permanently Delete Emails: Select all emails within the Trash folder and click the Delete icon. Alternatively, right-click on the Trash folder and choose Empty to delete all emails at once.
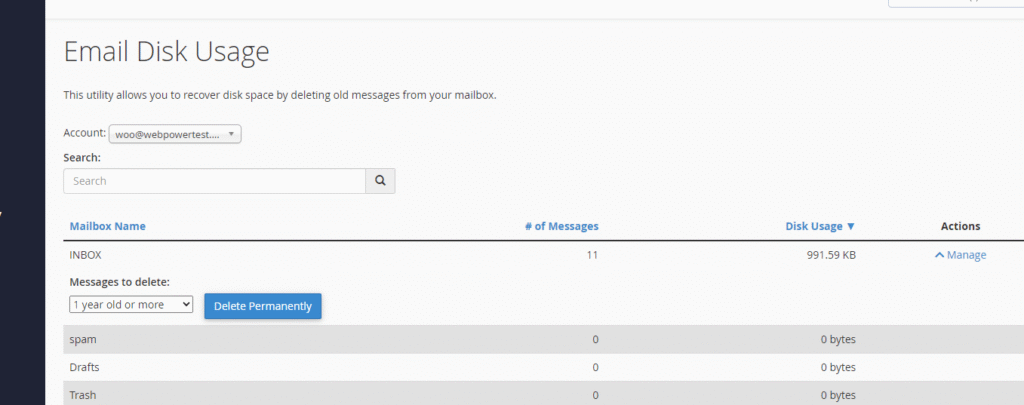
Step 5: Use cPanel’s Email Disk Usage Tool
For a more efficient way to manage old emails, you can use cPanel’s Email Disk Usage tool to identify and delete emails that are a year or older. Here’s how:
- Log In to cPanel: Return to your cPanel dashboard from the WebPower interface.
- Navigate to Email Disk Usage: In cPanel, find the Email Disk Usage tool under the Email section.
- View Email Storage Details: This tool shows you a breakdown of how much storage is being used by each email account. You can also see the size of individual folders and emails.
- Delete Old Emails: Use the tool to identify old emails or large folders that are taking up space. You can then go back to Webmail, navigate to these folders, and manually delete the emails or entire folders as needed.
Step 6: Monitor Your Email Quota
To ensure your email account remains within storage limits, regularly check your email quota in cPanel. This is displayed in the Email Accounts section, where you can see your usage next to each email address. Keeping track of your storage helps you manage your inbox effectively and avoid running out of space.

Conclusion
Regularly cleaning up your email account by bulk deleting old or unnecessary emails is essential for maintaining a well-organised and functional Webmail account. Using both the Webmail interface for immediate deletions and cPanel’s Email Disk Usage tool for more extensive cleanup will help you manage your email storage efficiently. With these steps, you can ensure your inbox remains clutter-free and your Webmail account runs smoothly. If you need further assistance, WebPower’s customer support is available to help with any questions or issues you might encounter.