Redirecting a domain to another website is a useful technique for various reasons, such as when you’ve rebranded your business, changed your domain name, or want to consolidate multiple domains. If you’re using WebPower as your hosting provider, you can manage domain redirects easily through cPanel. This guide will walk you through the steps to set up a domain redirect using cPanel.
What is a Domain Redirect?
A domain redirect, also known as URL forwarding, is the process of sending visitors from one domain to another. This can be a temporary or permanent redirect. When a user types in or clicks a link to the old domain, they are automatically redirected to the new domain.
Why Redirect a Domain?
- Rebranding: Redirecting the old domain to the new one ensures that visitors and search engines find your updated site.
- Consolidation: If you have multiple domains for the same website, you can redirect them to a primary domain.
- Correcting Mistakes: Redirects help fix broken links or incorrect URLs.
- Temporary Campaigns: Redirects can be used for marketing campaigns that lead to temporary landing pages.
Step 1: Log in to Your WebPower cPanel
To set up a domain redirect, you first need to access your cPanel.
- Log into your WebPower account: Visit the WebPower login page and enter your credentials.
- Access cPanel: From your WebPower dashboard, navigate to the “cPanel” section to open your control panel.
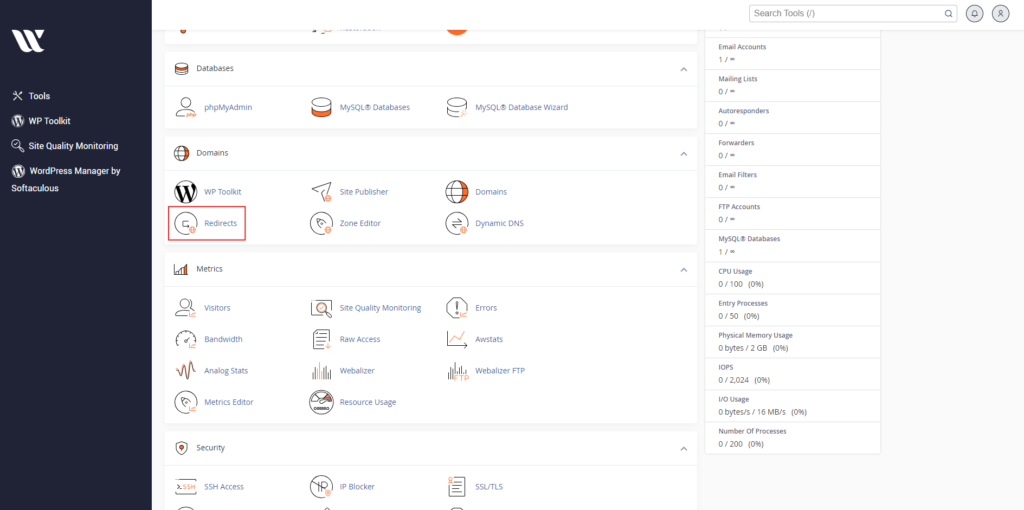
Step 2: Open the Redirects Tool
cPanel provides a straightforward tool for managing redirects.
- Find the “Redirects” option: In the cPanel dashboard, scroll down to the “Domains” section. Click on the “Redirects” icon to access the redirect management tool.
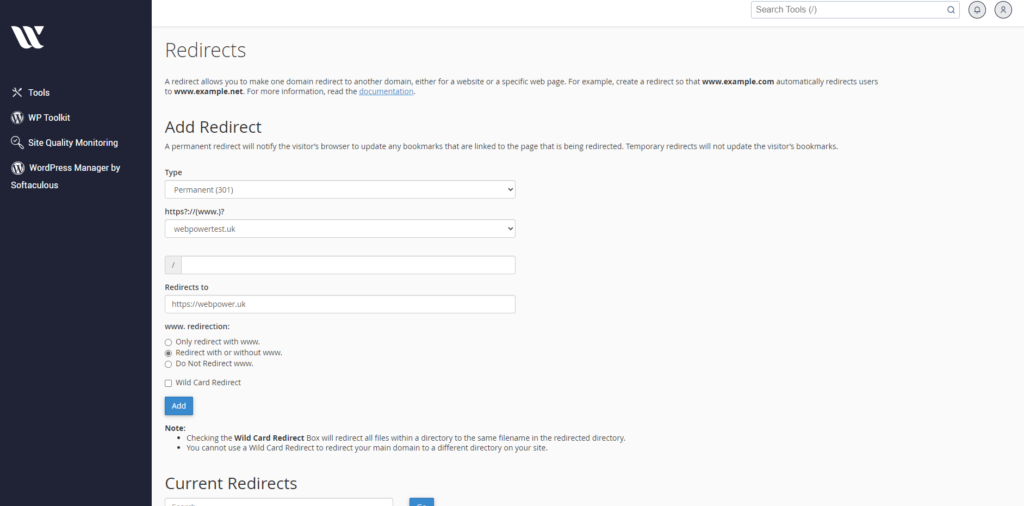
Step 3: Set Up a Domain Redirect
Once you’re in the Redirects section, follow these steps to create your redirect:
- Select the Redirect Type: You can choose between two types of redirects: Permanent (301): This redirect tells search engines that the change is permanent. This is ideal for rebranding or moving to a new domain. Temporary (302): This redirect is used for temporary changes, such as marketing campaigns or seasonal promotions.
- Choose the Domain: In the “Redirect” dropdown menu, select the domain you want to redirect from the list. If the domain you want to redirect isn’t listed, make sure it’s added to your cPanel.
- Enter the Destination URL: In the “Redirects to” field, enter the URL of the website you want to redirect to. Be sure to include the full URL (e.g.,
https://www.newsite.com). - Select Redirect Options: Redirect with or without www: Decide if you want to redirect both
http://www.oldsite.comandhttp://oldsite.comto the new URL. Wild Card Redirect: If you want all pages of the old domain to redirect to corresponding pages on the new domain, check the “Wild Card Redirect” option. - Click “Add”: After filling in all the necessary details, click the “Add” button to create the redirect.
Step 4: Verify the Redirect
Once you’ve set up the redirect, it’s important to ensure that it’s working correctly.
- Visit the Old Domain: Type the old domain into your browser and hit enter. You should be automatically redirected to the new domain.
- Check Different URLs: If you set up a wildcard redirect, visit various pages on the old domain to ensure they redirect to the corresponding pages on the new domain.
Additional Tips
- Update Your Links: If you have links pointing to the old domain on other websites or social media, update them to point to the new domain for consistency.
- Monitor Traffic: Use analytics tools to monitor traffic and ensure the redirect is working as intended.
- SEO Considerations: For permanent redirects, ensure that search engines recognise the redirect by using the 301 status code, which helps transfer the SEO value from the old domain to the new one.
Conclusion
Redirecting a domain to another website using cPanel is a straightforward process that can be completed in just a few minutes. By following these steps, you can efficiently manage domain redirects and ensure a seamless transition for your visitors and search engines.
If you encounter any issues or need further assistance, WebPower’s support team is available to help you with any questions you might have about domain management and redirects.