Purchasing a new domain is an exciting step, whether you’re expanding your online presence or launching a new project. Once you’ve secured your domain through WebPower, the next step is to add it to your cPanel as an addon domain. This process allows you to manage multiple domains from a single cPanel account, making it easier to maintain and update your websites.
In this guide, we’ll walk you through the step-by-step process of adding your new domain to cPanel via WebPower, ensuring that your site is set up correctly and ready to go.
Why Use cPanel for Domain Management?
Before diving into the tutorial, let’s briefly discuss why cPanel is the go-to choice for domain management:
- User-Friendly Interface: cPanel is designed with ease of use in mind, making it accessible even for beginners.
- Comprehensive Tools: It offers a wide range of tools to manage everything from email accounts to databases and DNS settings.
- Centralised Management: By using cPanel, you can manage all your domains, files, and resources from one central location.
Now that you understand the benefits, let’s get started with adding your new domain to cPanel.
Step 1: Purchase Your Domain via WebPower
Before you can add a domain to cPanel, you need to ensure that you’ve purchased the domain through WebPower. If you haven’t done this yet, follow these steps:
How to Purchase a Domain from WebPower
- Log in to Your WebPower Account: Go to the WebPower website and log in with your credentials.
- Search for Your Domain: Use the domain search tool to find and select the domain name you want to purchase.
- Complete the Purchase: Once you’ve chosen your domain, follow the checkout process to complete your purchase.
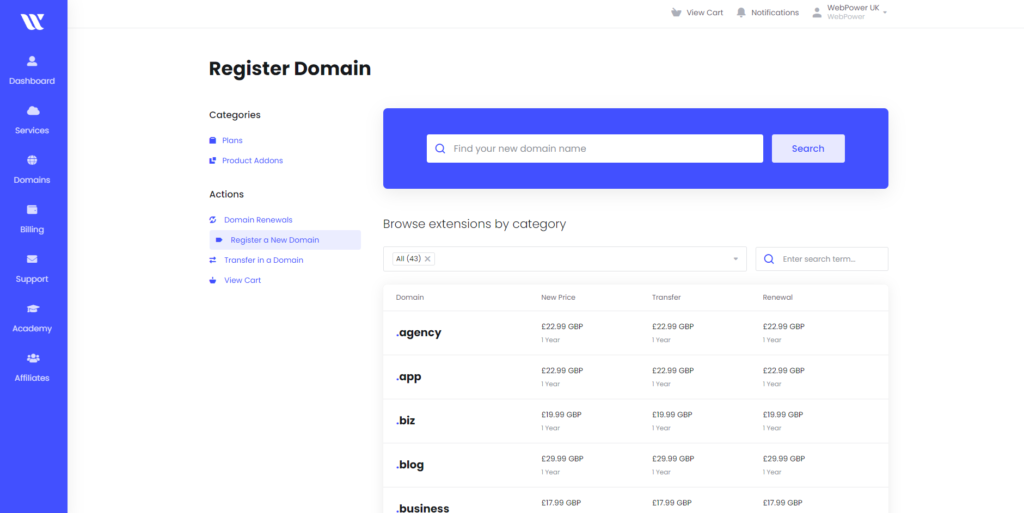
Once your purchase is complete, your new domain will be ready to add to cPanel.
Step 2: Accessing WebPower’s cPanel
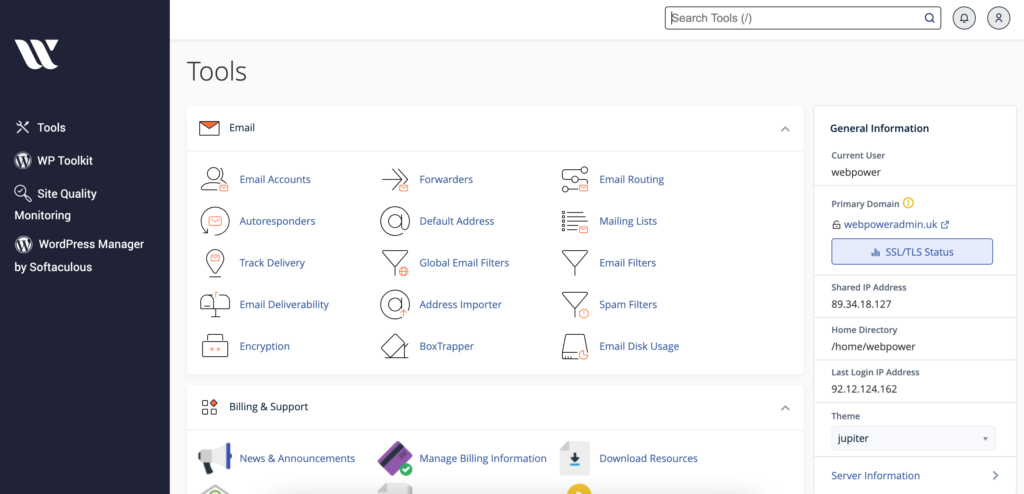
After purchasing your domain, the next step is to access cPanel, where you will add your new domain as an addon domain.
How to Access cPanel
- Log in to Your WebPower Account: Start by logging into your WebPower account.
- Navigate to cPanel: Once logged in, locate the cPanel link in your dashboard and click it to access the cPanel interface.
Step 3: Adding Your New Domain as an Addon Domain
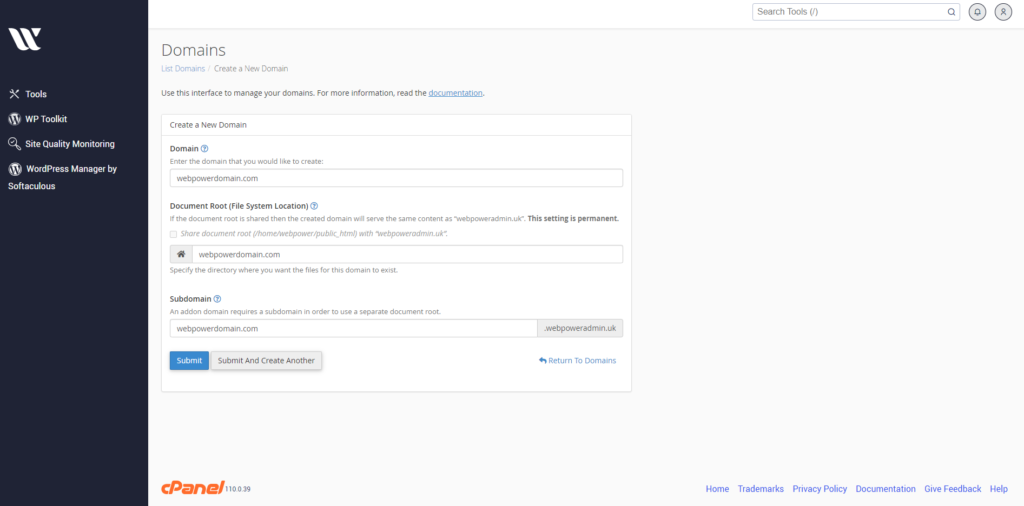
Now that you’re in cPanel, it’s time to add your newly purchased domain as an addon domain. This will allow you to host multiple websites under the same hosting account.
Step-by-Step Process
- Locate the Addon Domains Section: In cPanel, scroll down to the ‘Domains’ section. Here, you’ll find an option labeled ‘Addon Domains’. Click on it to proceed.
- Enter Your New Domain Name: In the ‘New Domain Name’ field, enter the domain name you purchased from WebPower (e.g., yournewdomain.com).
- Subdomain and Document Root: cPanel will automatically create a subdomain based on the new domain name. You can leave this as is. This is the directory where the files for your new domain will be stored. cPanel will automatically generate this, but you can customise it if needed.
- Create an FTP Account (Optional): If you want to create a separate FTP account for this domain, tick the box labeled ‘Create an FTP account associated with this Addon Domain’. This is optional but can be useful for managing files related to the new domain.
- Click ‘Add Domain’: After entering all the necessary information, click on the ‘Add Domain’ button. cPanel will now process your request and add the new domain to your hosting account.
Step 4: Configuring DNS Settings
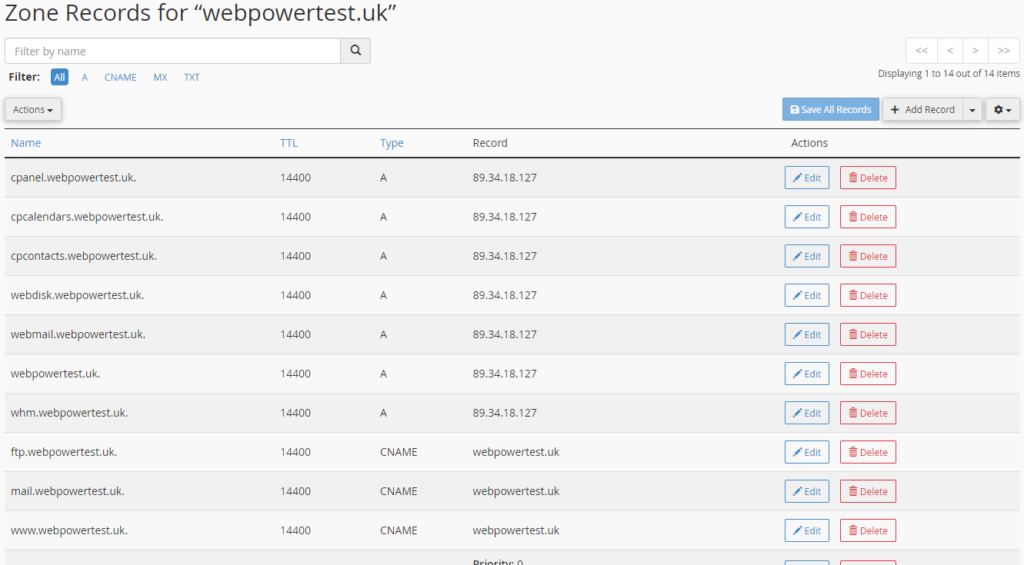
Once your domain is added as an addon domain, you may need to configure its DNS settings to ensure it resolves correctly to your WebPower hosting account.
Configuring DNS in cPanel
- Go to the DNS Zone Editor: In cPanel, navigate to the ‘Domains’ section and select ‘Zone Editor’.
- Select Your Domain: Find your newly added domain from the list and click ‘Manage’ to access its DNS records.
- Check the DNS Records: Ensure that the A record points to your WebPower server’s IP address. If needed, you can edit or add new DNS records from this interface.
- Save Changes: After reviewing and configuring your DNS settings, make sure to save any changes.
Step 5: Testing Your New Domain
After uploading your files, it’s important to test your new domain to ensure everything is working correctly.
How to Test Your Domain
- Install WordPress: Install WordPress on to the domain so you have website files to check.
- Access the Domain in a Web Browser: Open a web browser and enter your new domain name.
- Check Functionality: Browse through your website to make sure all links, images, and other elements are working as expected.
- Troubleshoot If Necessary: If you encounter any issues, revisit your DNS settings, file paths, and ensure that all files are correctly uploaded.
Conclusion
Adding a new domain to cPanel via WebPower is a straightforward process that allows you to manage multiple websites from a single hosting account. By following the steps outlined in this guide, you can easily set up your new domain, configure DNS settings, upload website files, and test your site for functionality.
Whether you’re expanding your business’s online presence or starting a new project, managing your domains through WebPower and cPanel gives you the tools and flexibility needed to succeed. If you encounter any challenges or need further assistance, WebPower’s support team is always ready to help.


