Clearing your website’s cache is an essential task to ensure that your visitors see the most up-to-date version of your site. Whether you’ve made changes to your content, layout, or images, sometimes these updates won’t immediately appear due to cached versions of your website being stored in visitors’ browsers.
Fortunately, if you’re hosting your website with WebPower, clearing the cache using the cPanel Litespeed Web Cache Manager is quick and easy.
In this blog, we’ll walk you through the steps to clear your cache in cPanel using the Litespeed Web Cache Manager in just 1 minute.
What is Website Caching?
Before we dive into the steps, it’s important to understand what caching is. Caching temporarily stores copies of your website’s pages, images, and other files to make it faster for visitors to load them. While this improves speed, it can also cause an issue when you make updates, as the cached version may display the old content.
By clearing the cache, you remove the outdated files, forcing your website to load the most recent version.
Step 1: Log in to Your WebPower cPanel
To clear your cache, you first need to access your cPanel.
- Log into your WebPower account: Visit the WebPower login page and enter your username and password.
- Access cPanel: From your WebPower dashboard, click on the “cPanel” button to open your control panel.
Step 2: Open the Litespeed Web Cache Manager
Litespeed Web Cache Manager is a powerful caching tool that helps optimise your website’s performance. You can also easily clear your website’s cache using this tool.
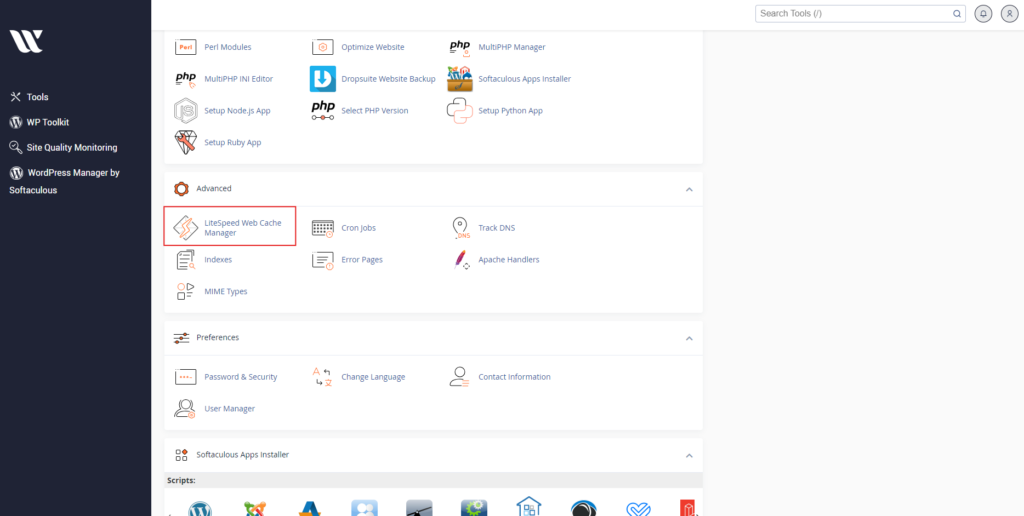
- Scroll to the Software section: In your cPanel dashboard, scroll down until you find the “Software” or “Advanced” section.
- Click on “Litespeed Web Cache Manager”: This is the tool we’ll use to clear your cache.
Step 3: Purge All Cache
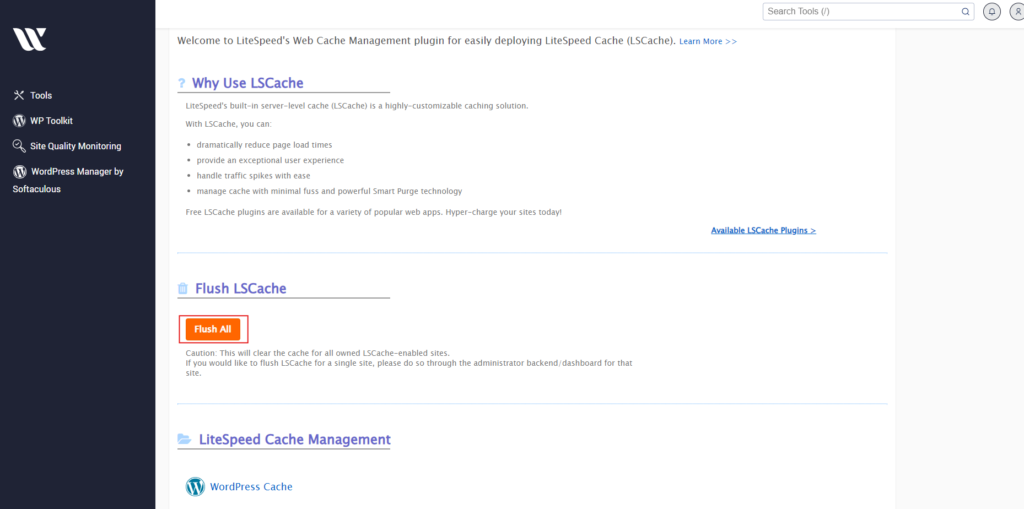
Once you’ve opened the Litespeed Web Cache Manager, clearing your cache is incredibly simple.
- Click “Flush All”: You’ll see a few options for managing your cache, but for a full refresh, simply click on the “Flush All” button. This will remove all cached files for your entire website.
- Confirmation: After clicking “Flush All,” the tool will immediately begin clearing all cached versions of your site. This process usually takes just a few seconds.
Step 4: Verify Your Website
After clearing the cache, it’s a good idea to visit your website and check that everything is up-to-date. You should also:
- Clear your browser cache: Sometimes your browser may still store old versions of your website, so it’s helpful to clear your browser’s cache as well.
- Test changes: If you made updates to your site, verify that they are now displaying properly.
Why Clear Your Cache?
Clearing your website’s cache is useful in a variety of situations:
- After making updates: Whenever you update content, images, or design elements, clearing your cache ensures visitors see the latest version.
- Troubleshooting: If your site isn’t displaying correctly or changes aren’t appearing, clearing the cache is often the first step to resolving these issues.
- Optimising performance: Cached versions of your site can improve speed, but when they get too outdated, they can cause performance issues. Regularly clearing the cache ensures smooth site performance.
Conclusion
Clearing the cache on your WordPress website hosted with WebPower is a fast and straightforward process using the Litespeed Web Cache Manager in cPanel. In just one minute, you can ensure your visitors are seeing the most current version of your site and resolve any display issues caused by outdated cached files.
For regular website maintenance, it’s a good idea to periodically clear your cache, especially after making significant updates to your website’s design or content.
Need help or have questions? The WebPower support team is always here to assist you!

