Your site icon, also known as a favicon, is a small but significant element of your website’s branding. It’s the tiny image that appears next to your website’s name in browser tabs, bookmark lists, and mobile home screens. Updating this icon can help reinforce your brand identity and make your site more recognisable to visitors.
In this quick guide, we’ll show you how to change the site icon on your WordPress website in just a few steps. No coding is required—just a couple of clicks in your WordPress dashboard!
What Is a Site Icon?
Before we dive into the steps, let’s quickly recap what a site icon is:
- Favicon: A small, square image that represents your website in browsers, bookmarks, and other places.
- Branding Tool: It’s a visual marker of your brand, often seen in the browser’s tab next to your site’s title.
- User Recognition: Helps users easily identify your website among multiple open tabs.
Step 1: Prepare Your Site Icon Image
Before you can update your site icon, you’ll need an image file ready to use. Here are a few guidelines for creating the perfect site icon:
- Size: The recommended size is 512 x 512 pixels. WordPress will automatically resize the image for different uses, but starting with a large, high-quality image ensures it looks sharp everywhere.
- Format: Save the image in a supported format, such as PNG, JPEG, or GIF. PNG is often preferred because it supports transparency.
- Design: Keep it simple and recognizable. Remember, this image will appear very small, so avoid using intricate details.
Step 2: Log in to Your WordPress Dashboard
To change your site icon, you’ll need to access your WordPress dashboard. Here’s how:
- Visit Your Site’s Admin URL: Go to
https://yourdomain.com/wp-adminin your web browser. - Log In: Enter your username and password to log in to your WordPress dashboard.
Step 3: Navigate to Site Icon Settings
Once you’re logged in, you can easily update your site icon from the WordPress dashboard.
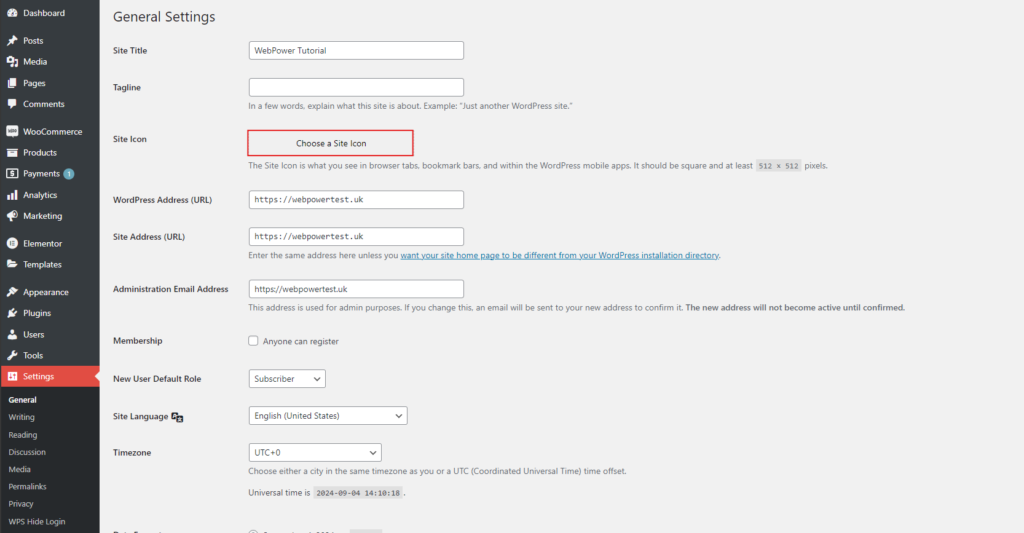
- Go to Settings > General: In the left-hand menu, navigate to Settings > General.
- Scroll Down to Site Icon: In the General Settings page, scroll down until you find the ‘Site Icon’ section.

Step 4: Upload Your New Site Icon
Now that you’ve found the Site Icon settings, you can upload your new icon.
- Click on Select Site Icon: In the Site Icon section, click the ‘Select Site Icon’ button.
- Upload Your Image: A media uploader window will pop up. You can either drag and drop your image file into the window or click ‘Upload Files’ to select the image from your computer.
- Crop the Image (If Needed): After uploading, WordPress may prompt you to crop the image to ensure it’s a square. Adjust the crop as needed and click ‘Crop Image’.
- Preview and Save: You’ll see a preview of your new site icon in the Site Icon section. If everything looks good, scroll down and click the ‘Save Changes’ button.
Step 5: Verify Your New Site Icon
After saving your changes, it’s a good idea to check that your new site icon is displaying correctly.
- Open Your Website: Visit your website in a new browser tab.
- Check the Browser Tab: Look at the tab where your site is open. You should see your new site icon displayed next to the site’s title.
- Clear Cache (If Necessary): If you don’t see the new icon right away, try clearing your browser’s cache or viewing your site in an incognito window.

Conclusion
Changing your site icon on WordPress is a simple process that can have a big impact on your site’s branding and user experience. With just a few clicks in the General Settings menu, you can upload a new icon that better represents your website and makes it more recognizable to your visitors.
Remember, your site icon is one of the first things users see when they visit your site, so make sure it reflects your brand’s identity. If you ever want to update it again, just follow these same steps.


